Steps to Import PST in Microsoft Outlook 2019 & Below Versions
Are you wondering about the solution for how to import PST files in Outlook 2000, 2003, 2007, 2010, 2013, 2016, 2019? Then, stop thinking about it. Here in this article, you are guided step by step.
MS Outlook is the most frequently used email application by many big industry professionals. It stores entire user mailbox particulars in the personal storage table (PST) in the structure of data files. The PST files occupy the user’s computer storage. Though, there is a scenario, when the user wants to move Outlook data to a new device from the existing one. It entirely depends on an individual’s preference where he/she accurately wants to move PST files, this could be to a new Outlook account or to an existing account to restore data.
In this article, I am going to share some figures related to importing PST data files into Microsoft Outlook. Let us know how you can import or add the selected PST file into several versions of Microsoft Outlook. You can try the most applicable solutions to add PST files to Outlook 2013 and other versions in a methodical manner.
Our primary analysis is how we can import PST in Outlook for all top versions. Check out the procedure which will help in adding the PST file and checking Outlook PST data file location in Windows 10 and other versions as well.
Why Does The User Need to Import PST Files?
- If you want to copy or switch Outlook data files from one account to another account.
- Want to switch Outlook data files to another system.
Steps to Import PST in Outlook 2019, 2016, 2013, 2010 Versions
Run Microsoft Outlook on your system and open and log in to your account.
- Go to the Menu bar. And, select the File option.

- Now, click on the Open & Export option and choose the Import/Export.

- On your screen, Import and Export wizard will open. Choose Import from another program or file. Then, click Next.

- Now, select the file type to import as Outlook Data File (.pst) and click the Next button.

- Now, hit on the Browse button to choose the PST file from the local system, then click the Next button.

- In case the file is encrypted by a password, enter it and validate it.
- Finally, select the location from where you want to import the PST file in Outlook. Also, confirm that to have Included subfolders selected. Then, lastly, click on the Finish button.

Outlook will start importing the selected PST file. The process will take a few seconds to complete the procedure. However, if the PST file is too large, it may take a few minutes to import a large PST data file to Microsoft Outlook.
Steps For Outlook 2007, 2003 & 2000 Versions
In the older versions of Outlook, the process to import PST into Outlook differs somewhat. However, the remaining steps remain the same as it is.
- Run Microsoft Outlook and open your account.
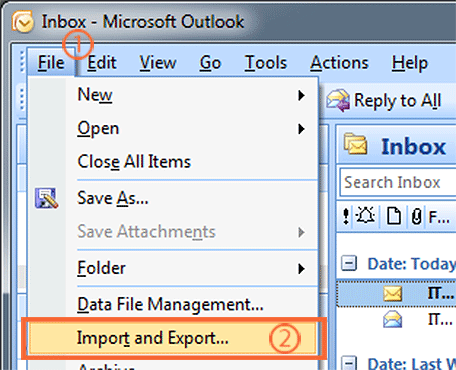
- Then, go to the main menu bar, and click on the File menu option.
- Next, click on Import and Export option from the File menu panelist.

- Once the Import and Export wizard opens, go after the same steps as illustrated in the previous section from step 4 onward.
These are some of the procedures for different MS Outlook versions to import PST in Outlook.
Final Verdict
In this blog, we discuss the steps for how to import PST in Outlook. For different versions of Outlook, there are different procedures to follow.
You reached here; means you have gone through all mentioned steps. Enjoy accessing PST files in Outlook 2019, 2016, 2013, 2010, and below versions.
Note: You also read another informative blog to understand the import process of OST files in Outlook.
Related Posts


